
Press-fitting operations

Question
I would like to use a servo system to perform press-fitting operations.
What should I do?

Answer
Move to a specified position and return to the origin position in “PR posiotion control mode”.
Press-fitting can be easily done by switching to “torque control mode”.
Please refer to the following for the setting procedure.
Setup Steps
Connect the computer and AC servo system using the dedicated USB cable.
Start the configuration software: KSD-Soft and connect the AC servo driver via USB.
1. Reading parameters
Start the “Parameter Editor” and click “Read Parameter” from the icon to read the servo driver parameters.
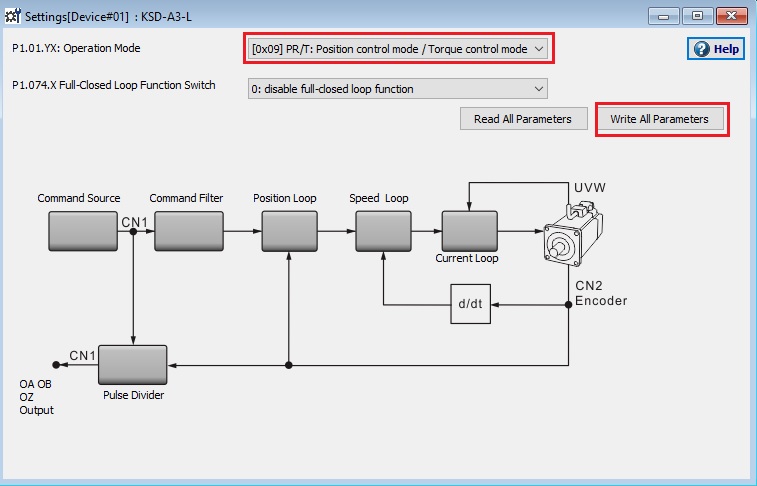
2. Set the operation mode
Start the “Mode Setting” and set the operation mode to “[0x09]PR/T: Position control mode / Torque control mode”.
To enable the settings, turn the servo system power off -> on.
* If you turn the servo system power off -> on, KSD-Soft will go offline, so please reconnect.
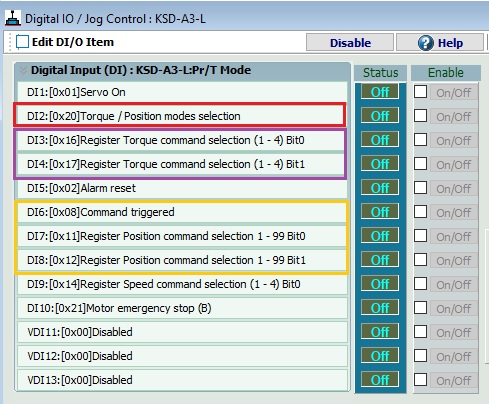
3. DIO settings
Start “Digital IO / JOG Control” screen and set the digital input.
This time, we will configure settings so that the following can be done from the external controller.
– Switching between position control (PR) mode / torque control mode (Figure below: red frame)
– Movement to a specified position in PR mode and return operation to the home position (below: orange frame)
– Switching the torque value (Figure below: purple frame)
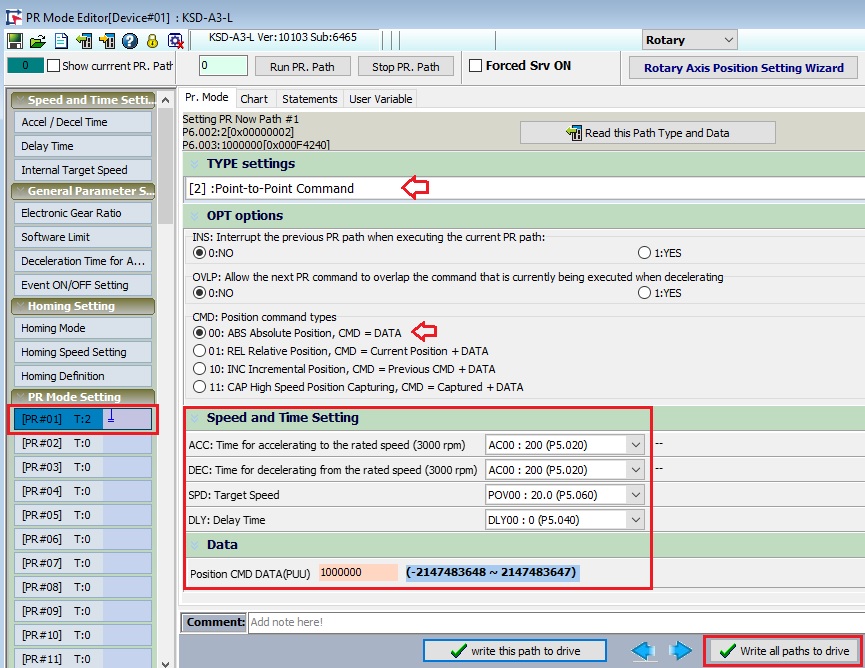
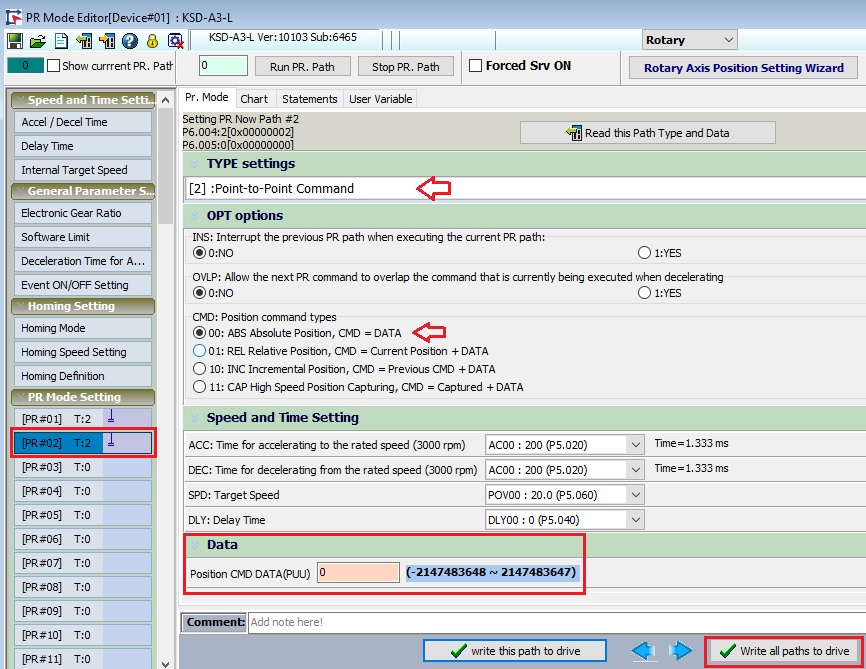
4. Setting PR mode
Launch the PR mode setting screen.
Set the homing setting.
Set “Move to specified position” in PR #1.
Set “return operation to the home position” to PR #2.
5. Setting the torque control value
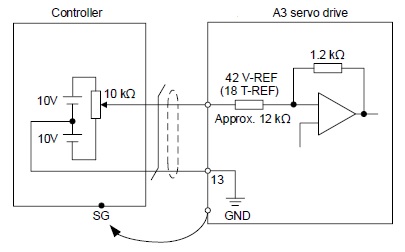
– If you set three setting values and use them by switching, he should set them to P1.012 to P1.014.
( If the torque value is fixed, please set it to P1.012 )
– When controlling with an external analog signal, wire as shown below.
6. operating
We will explain torque control using P1.012 as an example.
(Please decide the origin position in advance)
| Steps | Situation | Input | ||||||
| DI1 | DI2 | DI3 | DI4 | DI6 | DI7 | DI8 | ||
| 1 | Set PR mode | OFF | ON | OFF | OFF | OFF | OFF | OFF |
| 2 | Servo ON | ON | ON | OFF | OFF | OFF | OFF | OFF |
| 3 | Select PR #1 | ON | ON | OFF | OFF | OFF | ON | OFF |
| 4 | Move into position | ON | ON | OFF | OFF | ON | ON | OFF |
| 5 | Move completed | ON | ON | OFF | OFF | OFF | OFF | OFF |
| 6 | Switch to Torque control Press-fitting operation |
ON | OFF | ON | OFF | OFF | OFF | OFF |
| 7 | Press-fit completed Select PR #2 |
ON | ON | OFF | OFF | OFF | OFF | ON |
| 8 | Back to home posiotion | ON | ON | OFF | OFF | ON | OFF | ON |
| 9 | Move completed | ON | ON | OFF | OFF | OFF | OFF | OFF |
*For the second cycle, go to step 3
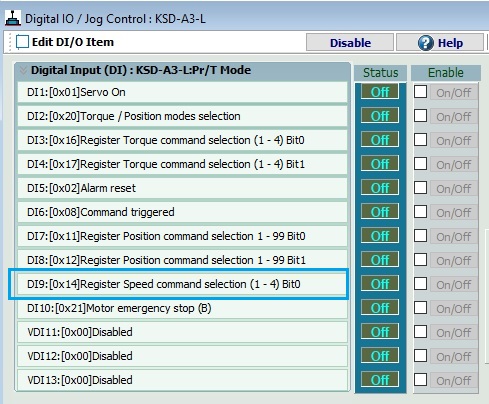
7. Torque control with speed limit
Click here for details
Set speed limit switching (Figure below: blue frame)
| Steps | Situation | Input | |||||||
| DI1 | DI2 | DI3 | DI4 | DI6 | DI7 | DI8 | DI9 | ||
| 1 | Set PR mode | OFF | ON | OFF | OFF | OFF | OFF | OFF | OFF |
| 2 | Servo ON | ON | ON | OFF | OFF | OFF | OFF | OFF | OFF |
| 3 | Select PR #1 | ON | ON | OFF | OFF | OFF | ON | OFF | OFF |
| 4 | Move into position | ON | ON | OFF | OFF | ON | ON | OFF | OFF |
| 5 | Move completed | ON | ON | OFF | OFF | OFF | OFF | OFF | OFF |
| 6 | Switch to Torque control Press-fitting operation |
ON | OFF | ON | OFF | OFF | OFF | OFF | ON |
| 7 | Press-fit completed Select PR #2 |
ON | ON | OFF | OFF | OFF | OFF | ON | OFF |
| 8 | Back to home posiotion | ON | ON | OFF | OFF | ON | OFF | ON | OFF |
| 9 | Move completed | ON | ON | OFF | OFF | OFF | OFF | OFF | OFF |
Inquiry
Click here for inquiries by email